1. Brief Introduction to CXL Switch, Host, and the Structure
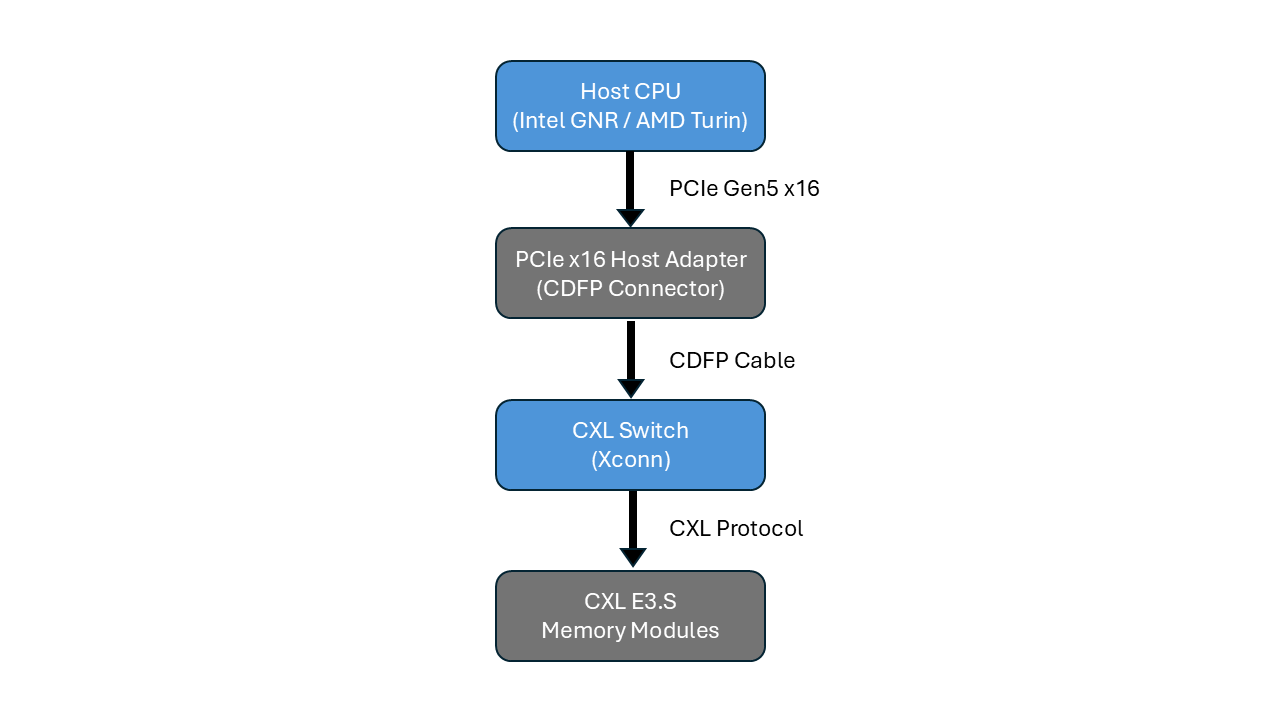
In the memory sharing and pooling solution of Falcon C5022, the CXL switch serves as the central bridge between host CPUs and external memory resources. Each supported host, including Intel Granite Rapids (GNR) and AMD Turin servers, connects to the Falcon chassis through a PCIe x16 host adapter, linked via CDFP cables. Once installed, the switch enables high-speed Gen5 connectivity, allowing the CPU to access disaggregated E3.S memory modules housed in Falcon C5022.
The Falcon C5022 management software dynamically provisions and reclaims CXL memory modules, enabling Intel Granite Rapids and AMD Turin platforms to flexibly pool or share memory resources as needed.
When working with CXL 2.0-capable hardware, it is essential to configure BIOS and Linux kernel parameters correctly to ensure smooth initialization. A key requirement is proper handling of DVSEC ID 8 capability checks, which BIOS and kernel drivers use to verify CXL 2.0 compliance. The current Xconn CXL switch is designed to operate without DVSEC ID 8, so aligning the host configuration to this behavior is crucial for successful device operation.
This article walks through the recommended BIOS and Linux kernel settings to enable CXL endpoint devices to be recognized correctly. It includes architecture diagrams, CLI configuration examples, and performance validation tips to help developers and architects streamline their setup process and achieve stable, repeatable results.
2. Settings for BIOS and Linux Kernel
Since the Xconn CXL switch operates without DVSEC ID 8, changes for both BIOS settings and OS-level driver parameters are necessary to align with the CXL switch implementation. Applying these settings ensures stable system initialization and enables full utilization of CXL memory devices. The following sections detail the required configurations for Intel Granite Rapids and AMD Turin platforms, as well as supported Linux kernels up to version 6.14.
Important:
- Please configure your operating system to Ubuntu 22.04 (kernel 5.15 - 6.2) or Ubuntu 24.04 (kernel 6.3 - 6.14) for the following workaround.
- In the BIOS, disable “Bypass EQ to Highest Rate” on both Intel Granite Rapids (GNR) and AMD Turin systems to ensure stable operation.
- DVSEC ID 8 is one of the extended capabilities of a CXL device, defined in the PCIe Configuration Space Extended Capability as a DVSEC (Designated Vendor-Specific Extended Capability).
A. Intel GNR/ AMD Turin BIOS-Level
There are two configuration options: First, use a modified BIOS to simplify validation. Second, Configure CLI based on CPU types. For Intel Granite Rapids systems, configure endpoint devices to operate in CXL 1.1 mode through CLI settings. For AMD Turin systems, configure endpoint devices to operate in CXL 2.0 mode through CLI settings. These settings ensure that the memory subsystem is initialized correctly and ready for use.
- Option 1: Use a modified BIOS that skips DVSEC ID 8 validation.
- Option 2: Configure the endpoint to report CXL 1.1 instead of 2.0. Apply the CLI commands:
- Intel GNR: Use CLI poolmap → force endpoint to CXL 1.1.
- AMD Turin: Use CLI poolmap20 → enable CXL 2.0.
B. Linux Kernel Version-Level
To ensure smooth system behavior, kernel parameters must be configured to control how CXL drivers are loaded. Adjusting these settings prevents drivers from auto-loading during boot, giving you full manual control over when and how CXL memory is initialized. Follow all steps below to ensure a clean and reliable setup process.
i. Blacklist CXL and DAX drivers
Prevent the automatic loading of CXL and DAX drivers to avoid boot failures. Blacklist CXL and DAX drivers at:sudo nano /etc/modprobe.d/blacklist.conf
Add the following lines:
blacklist cxl_acpi
blacklist cxl_pci
blacklist cxl_core
blacklist dax_cxl
blacklist dax_hmem
blacklist device_dax
Apply the changes:
sudo update-initramfs -u -k $(uname -r)
After reboot, the kernel will no longer auto-load these drivers, giving you full control to load them manually (via modprobe) only after BIOS and CLI configurations are properly applied.
ii. Blacklist CXL drivers at “GRUB”
Block CXL modules at boot to ensure the system does not reserve CXL memory before configuration. Add CXL drivers to module_blacklist at:
sudo nano /etc/default/grub
Update the GRUB line:
GRUB_CMDLINE_LINUX_DEFAULT="module_blacklist=cxl_core,cxl_acpi,cxl_pci"
Apply and reboot:
sudo update-grub
sudo reboot
This guarantees that no CXL modules are loaded during boot, allowing the memory to be reconfigured as DAX or system RAM after initialization.
3. Using CXL Memory as DAX Device for Linux Kernel Version 5.15 - 6.12 & Version 6.3 and Beyond
Once BIOS settings and driver blacklisting are completed, CXL memory can be configured as a DAX device to enable direct, byte-addressable access. This step ensures that memory is not automatically merged into system RAM and can be used for high-performance workloads. This section illustrates the procedures to follow for both Linux Kernel version 5.15 to 6.2 and Kernel version 6.3 and beyond.
A. Linux Kernel 5.15 – 6.2
1. Load DAX drivers
Manually load the required modules:
sudo modprobe dax_hmem
sudo modprobe device_dax
2. Verify device presence
Check if the DAX device is available:
ls /dev/dax0.0
3. Confirm device information
Use daxctl to view device details:
daxctl list -u
4. Result: You should see the DAX device listed with its size, alignment, and mode: "devdax", confirming it is ready for use.
B. Linux Kernel 6.3 and Beyond
1. Disable Automatic Memory Online
Ensure newly detected CXL memory stays offline for manual configuration:
echo offline | sudo tee /sys/devices/system/memory/auto_online_blocks
2. Load DAX Drivers
Manually load the required modules:
sudo modprobe device_dax
sudo modprobe dax_hmem
3. Reconfigure CXL Memory to DAX Mode
Convert offline memory blocks into a DAX device:
sudo daxctl reconfigure-device --human --mode=devdax --force dax0.0
4. Verify device presence
Check if the DAX device is available:
ls /dev/dax0.0
daxctl list -u
5. Result: A successful configuration will show /dev/dax0.0 and report the device in devdax mode, confirming that it is available for applications that require persistent memory semantics.
4. Key Takeaways
- Configure Intel Granite Rapids systems to operate in CXL 1.1 mode using the poolmap CLI command.
- Configure AMD Turin systems to operate in CXL 2.0 mode using the poolmap20 CLI command.
- Settings include both BIOS CLI configuration (poolmap/poolmap20) and driver blacklisting.
- With correct setup, CXL memory can be reliably used as DAX or System RAM.
This feature is part of our upcoming CXL Memory Sharing Solution. Join our launch event or contact us to learn more about how it can accelerate your deployments.